Getting Started with GCC
C99/C++ Compilation with the GNU Compiler Collection
This document describes the first steps in creating C99/C++ programs, using the GNU C++ compiler. Apart from directory and path specifications, these steps are applicable to MSYS2, Cygwin, Mingw-W64, Linux, Unix, macOS — basically anywhere GCC is available. We also provide some background regarding the development process and available tools.
PREREQUISITES — You should already…
- have some non-trivial programming experience with a statically typed language;
- have an installation of a relatively recent GCC (at least C99/C++11 capable);
- be familiar with command line basics in a POSIX shell, Command Prompt, or PowerShell.
Introduction to GCC
GCC (GNU Compiler Collection) is available on many operating systems. It is used for many purposes, including cross-compilation to other systems, which are often embedded. For Windows, GCC can be obtained via Cygwin, MSYS2 or a distribution of MinGW-w64 (get at SourceForge or nuwen).
GCC provides compilers for several languages, but not all of which may be installed, or available. At minimum, you need the C & C++ compilers and binutils, which is the name of a set of programs working with objects, or executables, and includes the GNU assembler (as). Having some, or all of the GNU coreutils available, could be convenient, as well as the GNU debugger (gdb).
We will discuss some, but not all, of the command options you can use with GCC. For more information, see GNU's extensive documentation on Invoking GCC.
GCC on Linux
You Linux distribution's package manager will have all necessary development packages. The problem is finding the correct package name, since they are not necessarily the same across all distributions.
On Debian-based distributions like Ubuntu (and Ubuntu in WSL), the meta-package is called
build-essential. This will install GCC compilers (C & C++), linker, binary utilies
(‘binutils’), and other common development tools, including
make.
You may also want to install gdb (GNU debugger), git, cmake,
and ninja, which works well with CMake. We also include
library documentation man pages. This will also work in
WSL, assuming a Debian-based distribution is
installed.
sh — Install GCC and Other Tools on Debian-Derived Linux Distributions
> sudo apt install build-essential cmake ninja gdb git manpages-dev -y
And that's that. You can test by running: ‘gcc
--version’ and/or ‘g++ --version’
in your shell.
GCC on Windows
Several distributions/builds of MinGW-w64 are available. These do not
require installation… simply extract, set the PATH
environment variable, and run gcc or
g++:
WinLibs — Relatively newer distribution without extra libraries (despite the name). Does provide some assemblers, as well as an optional LLVM suite (Clang/LLDB/LLDB). It is distributed as Zip or 7-Zip files, which requires extraction.
Nuwen MinGW Distro — Infrequently updated, with several tools and libraries, including Boost. Versions with, or without, the Git version control system are available. It is packaged as a self-extracting executable (easiest).
That is not the end of the possibilities though…
MSYS2 — Provides various POSIX shells & utilities; this includes the pacman package manager, which can be used to to install GCC and numerous other libraries, including boost and Qt. Pacman also allows you to keep everything current.
WSL — Increasingly feasible, is using WSL (Windows Subsystem for Linux) for development. WSL and WSL2 provides a full Linux experience alongside Windows. One can even cross-compile to Windows from WSL (or other Linux distribution).
You must ensure that the GCC program
executables are on your PATH, so they can be executed from
any directory.
Instead of using the Command Prompt Console, use Windows Terminal (or download from GitHub). It comes standard with Windows 11, and can be configured to be the default host for all command-line programs (even on later builds of Windows 10).
All example commands here assume that you are using GCC in either a POSIX shell, or PowerShell (either the legacy ‘Windows PowerShell’, or the cross-platform modern ‘PowerShell 7’).
Minimal MinGW-w64 Installation
There are many ways to install a MinGW-w64 distribution. Here is one method with the fewest steps, and which does not require Administrator privileges on your PC. We will…
Download and extract the WinLibs MinGW-w64 POSIX threads UCRT 64-bit distribution's zip file. If you can handle 7-Zip files, the 7-Zip version is much smaller. Or go to the download page and choose your option.
Amend the
PATHenvironment variable (optionally, persist the modification).
Furthermore, to test the installation and establish an environment and repeatable process for writing C programs (projects), we will…
- Create a development work directory (work) & make it the current working directory.
- Create a
helloworldproject sub-directory under the work directory. - Make the
helloworldproject directory the current directory. - Edit and save an example
helloworld.cfile orhelloworld.cppfor C++. - Compile and run
the
helloworld.exeprogram.
We will be using the built-in Command Prompt shell for all commands, just in case you are unfamiliar with Powershell. You should use PowerShell (PowerShell 7 specifically), and we shall show equivalent commands.
Prerequisites
An up to date Windows 10/11 installation, and the ability to find and run applications from the Windows Start menu is required, particularly because later builds of Windows provide the cURL program. In addition, the ability to type command lines verbatim, would help.
Open Command Prompt
Click on the Windows Start Menu, and start typing: Command. You should then see ‘Command Prompt’ being selected for you:

Click on Command Prompt.
This will run cmd.exe. You now have a
command line shell.
Download & Install WinLibs's MinGW-w64 Distribution
Type each of the following command lines, pressing the enter/return key after each line.
Command Prompt — Download and Run Nuwen MinGW-w64 Installer
> set "URL=https://github.com/brechtsanders/winlibs_mingw/"
> set "URL=%URL%releases/download/14.2.0posix-19.1.1-12.0.0"
> set "URL=%URL%-ucrt-r2/winlibs-x86_64-posix-seh-gcc-14.2.0"
> set "URL=%URL%-mingw-w64ucrt-12.0.0-r2.zip"
> curl -LO %URL%
Or download the Zip, and extract using your favourite GUI tools.
Here is the equivalent series of commands if you are using PowerShell (but using the URL for the 7-Zip version; change if necessary):
PowerShell — Download and Run Nuwen MinGW-w64 Installer
> $URL = "https://github.com/brechtsanders/winlibs_mingw"
> $URL += "/releases/download/14.2.0posix-19.1.1-12.0.0-"
> $URL += "ucrt-r2/winlibs-x86_64-posix-seh-gcc-14.2.0-"
> $URL += "mingw-w64ucrt-12.0.0-r2.7z"
> curl -LO $URL
Or download the 7z, and extract using your favourite GUI tools.
Now you must extract the compressed archive file you downloaded into
some directory, for example, called mingw64. If you
happened to extract it with right-click in a file explorer, the
directory will be mingw64 (name inside the archive). Be
sure not to end up with something like mingw64\mingw64!
Choose any directory, but for this walk-through and simplicity, we
suggest ‘C:\’. A subdirectory
called mingw64 will be created in your
chosen destination, e.g.: ‘C:\mingw64\’. Wait for the extraction to
complete.
WARNING — Spaces in Directory Names
For any development purposes, and as a destination location for extracting Nuwen MinGW-W64, do not choose directories with spaces or unusual characters in the name. Only use alphabetic characters, and maybe underscores and decimal digits.
Optionally, you can now delete the archive file using the command
line: del filename, or simply use Windows Explorer to
delete it. Use ri
filename in PowerShell.
You cannot continue with these steps until you have…
- Downloaded a MinGW-w64 archive to a downloads directory;
- Successfully chosen a mingw directory for extraction;
- Successfully extracted the WinLibs archive, or the Nuwen MinGW-w64 archive to mingw directory.
- Ensure that the top-level directory is
mingw64(WinLibs) orMinGW(Nuwen).
Please verify that the above steps were successful, that you understand what happened; and you know the location of the mingw directory where you extracted MinGW-w64.
Set PATH and Test
MinGW-w64
Once the extraction is finished, we need to set the
PATH, so that the gcc and
make programs can be found without
specifying a full path name. They are in C:\mingw64\bin (for example), assuming that
you chose ‘C:\’ as the destination directory for extraction.
In the open Command Prompt window, enter
the following commands. These will set C:\mingw64\bin;
first in the PATH, and check if it was
successful.
Command
Prompt — Set PATH and Check for
gcc.exe
> where gcc
The equivalent commands for PowerShell:
PowerShell — Set
PATH and Check for gcc.exe
> (Get-Command gcc).Source
The output of the last command should be (either one):
C:\mingw64\bin\gcc.exeIf not, you will have to check for typing mistakes, or omitting a
step. In case gcc.exe can be
found, you must either remember to set the PATH the same
way every time you open a new Command
Prompt. Or you can persist is in the Registry.
Persistent PATH Modification
To persistently set the PATH, you will have to
edit the Windows Registry indirectly via a Control
Panel dialog (applet). Select the Start
Menu and type: edit
environment. You should see the following, which you can
click on:

Or, from the command-line (Command Prompt or PowerShell, run the following:
rundll32
sysdm.cpl,EditEnvironmentVariables
In the Environment Variables dialog that opens, select the ‘Path’ entry in the ‘User variables…’ table, so that it is highlighted. Then click on the Edit… button.
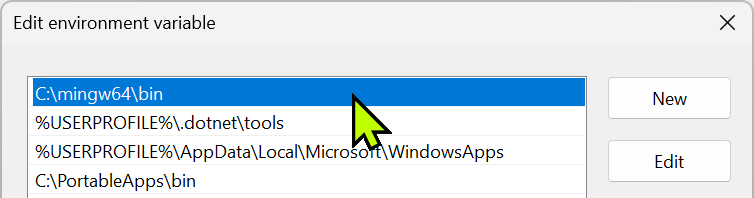
In the resulting Edit environment
variable dialog, click on the New button. This will allow you to type:
‘C:\mingw64\bin’ below the other
paths that may be present.
NB! Do
not edit Path in the System variables table!.
This should suffice, but to avoid potential issues, click the Move Up button repeatedly, until
C:\mingw64\bin is at the top. Click OK, followed by OK on the
first dialog, to complete the process. This does not affect currently
open programs.
Now, every time you open a new Command
Prompt, or even a new PowerShell
window, the PATH will be set correctly, and the GCC executables can be run by name.
NOTE — Older Version of Windows & Control Panel
The editing of environment variables, in particular the
PATH/Path environment variable, may
not appear as shown in the image above. Instead, you will be given a
text box containing the value of the
PATH/Path environment variable. In
this case, you must put ‘C:\mingw64\bin;’
in front of the existing value (note the
semicolon). Then you can click OK to finish.
Set PATH Permanently From a Command Line
OPTIONAL/ADVANCED — One can modify the
PATH environment variable persistently in the Windows
Registry from the command line, in either Command
Prompt with setx.exe, or in PowerShell via the
Registry:: ‘drive’.
Command Prompt — Change PATH in Registry
Alternatively, you can use PowerShell, which is a bit more verbose since we are not using shortcut aliases here:
PowerShell — Change PATH in Registry
> $curpath = (Get-ItemProperty -Path $location -Name "PATH").Path
> Set-ItemProperty -Path $location -Name "PATH" –Value "C:\mingw64\bin;$curpath"
Since the modification will be in the Registry, it will only affect new instances of programs. Open a new Command Prompt or PowerShell session, to see the effect.
Also note that we are modifying the user PATH
environment variable. It will have no effect on other users of your
PC.
Development Work Environment
But first, you have to decide where you will put your C programs. Each program should be in its own directory. If you write many programs, you will thus have many directories. It would be convenient to put these directories under some parent directory. This represents your ‘workspace’, or work directory.
Here we choose to make a ‘work’ directory under your
‘home’ directory (%USERPROFILE%), but you can choose any
name. We will refer to this directory simply as: ‘your work-dir’.
Command Prompt — Create a Development ‘Work’ Directory
> mkdir work
> cd %USERPROFILE%\work
The equivalent commands for PowerShell:
PowerShell — Create a Development ‘Work’ Directory
> mkdir work
> cd $Env:USERPROFILE\work
In both cases, the last command could have been abbreviated to
cd work, but would only work if your current directory is
the parent directory of work. The commands presented, will
work regardless of your current working directory.
Project Directory
Every programming session should start with the last line. This means
we always assume from now on, that your work-dir is the current working directory.
Every new program or project, should have a
name, e.g.: ‘helloworld’ which is your
project directory for our first example:
Command Prompt/PowerShell — Create Project Directory and Make Current
> mkdir helloworld
> cd helloworld
This will make %USERPROFILE%\work\helloworld\
($Env:USERPROFILE\work\helloworld), the current
directory, where we can now continue to create C source
files for your project
(helloworld, in this case).
Edit Project Source Code
To write programs, you need an editor. Tastes vary, so we hesitate to offer advice. The simplest option is Notepad2, or Notepad++, while VSCode requires some configuration, but is a better long-term investment. However, the standard Windows Notepad will do for now… choose one command-line below:
Command Prompt — Edit Project Source Code File (C or C++)
> notepad helloworld.cpp
If you have installed VSCode, the executable is called code.exe, which should be on your PATH, so you could run: code . in your project directory (VSCode treats directories as projects). You could also just run: code helloworld.cpp to edit the file.
The last command will bring up Windows Notepad, where you must now enter a C, or C++ program. Remember to save the file, before you continue to compile it. Here is the C program:
helloworld.c —
Example ‘Hello World’ C Program
/*!@file  helloworld.c
*  @brief Example ‘Hello World’ C Program
*/
#include <stdbool.h>       //←good convention. for `bool`.
#include <stdlib.h>        //←good convention. for `EXIT_SUCCESS`.
#include <stdio.h>         //←necessary for `printf`, etc.

int main (void) {
   printf("Hello, World!\n");
   return EXIT_SUCCESS;
   }
And here is the equivalent C++ program:
helloworld.cpp —
Example ‘Hello World’ in C++ Program
/*!@file  helloworld.cpp
*  @brief Example ‘Hello World’ C++ Program
*/
#include <iostream>

int main () {
   std::cout << "Hello, World!\n";
   return EXIT_SUCCESS;
   }
Once your program is saved, switch back to the Command Prompt window.
Compile and Run ‘Hello World’ C Program
The first command will create a debug compilation
(-g2), suitable for development and learning.
Replace ‘-g2’ with ‘-O2 -DNDEBUG’ to perform a
release compilation suitable for production.
Command Prompt — Compile & Run the ‘Hello World’ Project
> .\helloworld
If the compilation was successful (no syntax errors, i.e.
typing errors), the last command will run the
helloworld.exe executable created by the compiler. It
should output:
Hello, World!Compile and Run ‘Hello World’ C++ Program
The first command will create a debug compilation
(-g2), suitable for development and learning.
Replace ‘-g2’ with ‘-O2 -DNDEBUG’ to perform a
release compilation suitable for production.
Command Prompt — Compile & Run the ‘Hello World’ C++ Project
> .\helloworld
If the compilation was successful (no syntax errors, i.e.
typing errors), the last command will run the
helloworld.exe executable created by the compiler. It
should output:
Hello, World!From this point, you have your very own GCC
compiler, together with some utilities like GNU
mingw32-make. To verify that
mingw32-make.exe is available, your can
run the following:
Command Prompt — Check Availability of GNU Make
> mingw32-make --version
C:\mingw64\bin\make.exe

GNU Make 4.2.1
Built for Windows32
Copyright (C) 1988-2016 Free Software Foundation, Inc.
License GPLv3+: GNU GPL version 3 or later <http://gnu.org/licenses/gpl.html>
This is free software: you are free to change and redistribute it.
There is NO WARRANTY, to the extent permitted by law.
Now you are all set to write real C programs on Windows. GCC is not a toy compiler.
WinLibs MinGW-w64 for Windows Installation Summary
Here is a summary of the steps described above (hopefully unambiguously).
Download and Install MinGW-w64
- Find and download a MinGW-w64 distribution: WinLib's MinGW-w64.
- Extract the distribution to some directory, e.g.:
C:\mingw64.
Adjust
PATHEnvironment VariableThe can be done for each new Command Prompt session, or persistently.
- Add e.g.:
C:\mingw64\binfirst inPATHenvironment variable.
- Add e.g.:
Development Work Directory
This is done only once, or when you want an new location for all your C projects.
- Create a development work directory inside a Command Prompt window.
Create C/C++ Projects
For each new C/C++ programming project…
- Make your work directory current
(
cdwork). - Create a project directory
(
mkdirproject) - Make project directory the current
directory (
cdproject). - Edit source file(s) using your favourite editor and SAVE in project directory.
- Compile your project
- Run and test your project
- Make your work directory current
(
Edit Existing C/C++ Project
- Make your work directory current
(
cdwork). - Make existing project directory the
current directory (
cdproject). - Edit source file(s) using your favourite editor and SAVE in project directory.
- Compile your project
- Run and test your project
- Make your work directory current
(
ADVICE — MSYS2's Alternative MinGW-w64 GCC Distribution
For production use, WinLib's MinGW-w64 is fine, but the MSYS2 project provides:
- A minimal POSIX environment (bash shell and terminal).
- The pacman package manager to install and update packages.
- Many tools and libraries managed with pacman.
MSYS2 is recommended, and the closest you will get to an ‘official’ MinGW-w64 distribution, since the maintainers of MSYS2 are actively involved with the MinGW-w64 project. It will also make it easier to build projects that require typical UNIX build tools.
Even Visual Studio Code documents using MinGW-w64 with VSCode using MSYS2 as an example, including the UCRT (recommended) version.
The Development Process
Process, indeed. Although tools help simplify the process, it must be very clear in your mind that compiling C/C++ programs, require a series of tasks, which we explain below.
Overview
Regardless of how you control the process, or which tools you use,
the process to successfully create an executable (including DLLs or shared libraries) involves the following steps
or phases. The first two steps must be repeated for every
.c or .cpp file.

Preprocessing — This part of the compilation process only manipulates text, which programmers control via special (non-C/C++) preprocessor directives. The preprocessor (
cppin GCC) outputs a temporary text file which incorporates the effects of the directives. The process will terminate if any invalid preprocessor directives are encountered.Code generation — This phase of the process only uses the temporary file created by the preprocessor, and from this file outputs machine code and information to a single assembler (
.s) file. In GCC, the assembler (as) physically creates the object file (.o) from the assembler file. The code generation phase also consists of several well-defined and text parsing phases, but we are generally not concerned with those.Linking — After successful object file(s) creation, the linker (
ldin GCC) is called. By using either command line arguments, or embedded object file information, the linker is instructed to link the object file(s) with object files from the standard C and C++ libraries, and with the startup code for your operating system. If all external references have been resolved, an executable is created, whose name is dependent on the argument to the GCC-ocommand line option. The preprocessor and compiler (and optionally, an assembler) phases execute for every source file in a multi-file program. Only at the linking phases does it all come together. The C/C++ compilers never have any idea of the “big picture”.

In embedded systems, the result from the linker may just be a binary image of the program, as it would appear in flash memory or ROM. The executable does not have to be destined for the same architecture as the compilation suite used to produce it — then we call it cross-compilation (compile on one architecture, for another architecture).
C Preprocessor
Compared to many other languages, the C/C++ languages are deficient
in some ways. To alleviate this to some degree, the C/C++ standards
specify a preprocessor. In the GCC,
this is called cpp (for C
PreProcessor). C++ will create the
__cplusplus preprocessor macro, but otherwise there is no
difference in preprocessor behaviour when called on C++ programs.
The C preprocessor only manipulates text. Its input is text, and its output is text. All it understands about C/C++ is the concept of a token (words, punctuation, literals, etc.). It has no idea of C/C++ syntax, semantics or scope (blocks) at all. It does not know what a “library” is, or the meaning of include files. We emphasise this, because some people expect a higher degree of intelligence from the preprocessor than it actually possesses.
We can ‘fake’ the lack of symbolic constants, global
variables, global functions and fast functions
with the preprocessor. Both C & C++ have inline
functions, which somewhat reduce the need for the preprocessor in this
regard, but do not completely replace it. An additional, and very
powerful, use for the preprocessor, is for “conditional compilation”.
This means that we can use it to potentially compile different parts of
the same code base, by simply changing command line arguments
during compilation.
C++ inline functions, together with template functions,
can reduce reliance on the preprocessor. C++11 also adds “proper”
symbolic constants (compile-time values), with the addition of the new
constexpr keyword, which eliminates the need for
#define to represent immediate values. Nevertheless, the
preprocessor plays a vital role in creating portable programs.
Object Code Generator
The output of the preprocessor is normally fed to the “actual” C/C++ compiler — the part that understands C/C++ syntax, and that creates object files (indirectly, since there may be an assembler involved). According to the standard, there may only be one object file, given one source file, or compilation unit. If preprocessor directives are encountered at this point, the compilation will fail, since they are not part of the language syntax.
If an assembler is involved, as in the case of GCC, the C/C++ compiler produces a temporary assembler
file (*.s in GCC), which in turn is
fed to the assembler. The assembler then creates the object file, but
the C/C++ compiler still controls what will eventually end up in the
object file. GNU's assembler is called
as, but is seldom called directly.
Whether or not there is an assembler, the object file will contain the following: data with global lifetime, machine code, public symbols for C/C++ elements with external linkage, and external references. The external references must link up with public symbols in the same, or other, object files that constitute the complete program.
Linker
A linker can be used to create an executable from any number of object files, produced by any compiler, or mixture of compilers, provided the correct calling and naming conventions are used. You cannot, for example, expect an object file created by the Fortran compiler, to be practically linkable with an object file created by a C compiler, since the calling and naming conventions may not match. It is theoretically possible, but there are practical issues to be considered.
Linkers also create shared libraries (POSIX,
*.so), or DLLs (Dynamic Linked
Libraries — Windows®, *.dll). GNU's
linker is called ld, but it is rarely
called directly. Linkers can set required free memory and stack space
for programs.
The linker must link all external references in object files and
libraries, to public symbols in the same, or other, object files and
libraries. This is called: “resolving external references”. If public
symbols are not found, for example when a library has been omitted, the
linker will report a message containing the phrase “…unresolved
external…”. Duplicate public symbols are not allowed, but the C/C++
compiler can mark some duplicate symbols in such a way that the linker
will only use one, instead of reporting a “…duplicate symbol…” error.
This is normally used for inline and/or template
functions.
Development Tools
Here we discuss the development tools used in C/C++ compilation, from a GCC perspective.
Compilation Drivers
Using the preprocessor, code-generator and linker together, and in
the correct sequence, is crucial for the creation of C/C++ programs.
Fortunately, some tools make this easier; in particular, two tools:
gcc (for C), and g++ (for C++), are
“compilation drivers”, if you like. With options (switches), these tools
can be controlled to call, or not call, the linker; to leave or delete
temporary or object files, etc. Some of these options are described
below.
PREPROCESSOR OPTIONS
Several options can be passed to the preprocessor. The most common are:
- The
-Dswitch allows for the creation of macros on the command line (generally to control conditional compilation). - The
-Iswitch can be used to specify additional directories to search for include files.
ASSEMBLER OPTIONS
- The
-Waswitch can be used to pass options to the assembler. - The
-Sswitch can be used to save the assembler file generated, instead of deleting it after the object file has been created. - The
-masm=intelswitch is useful, in that it produces assembler instructions in Intel format (instead of the default AT&T format). - The
-fverbose-asmswitch is useful when inspecting generated assembler code.
CODE GENERATION OPTIONS
The most common switches to control warnings are:
-Wall(all warnings on);-Wextra(extra warnings on);-Wpedantic(advisory warnings on).- The
-std=‹c-dialect›, or-std=‹c++-dialect› switches control C/C++ dialect (version) options. - The
-fsyntax-onlyoption, will also prevent compilation — only syntax is checked.
There are options to control code optimisation:
- Speed/general:
-O0(none),-O1(light),-O2(medium),-O3(very aggressive). - Optimize for size:
-Os(not guaranteed to be smaller than-O1,-O2or-O3). - The
-gswitch is very important: it adds debugging information for debug compiles. It can be followed directly by an integer number, e.g.:-g2, which controls the amount of information provided togdb. This information is required by the GNU debugger (gdb).
Additional warning options:
-Wshadow— Warns when variables shadows (hides) variables on a higher scope.-Wstrict-prototypes— Will warn when not correctly declaring and defining functions (C is quite forgiving).-fanalyzer— Extra static analysis (only from GCC 10 and later).
LINKER OPTIONS
The compiler drivers will generally pass the correct standard libraries and their locations to the linker.
- The
-sswitch will prevent symbols being written to executables. - The
-lswitch can specify additional libraries. - The
-Lswitch can add additional directories to search for libraries. - The
-cswitch prevents the driver from calling the linker.
All switches have defaults. Given a simple program, like your typical
C99 or C++ “Hello, world!” program in a main.c or
main.cpp file, running gcc main.c, or
g++ main.cpp will produce an executable called
a.exe on Windows, or a.out on POSIX systems. It will automatically control the
various phases of compilation, and delete all temporary files generated.
As a minimum, you should add a -o ‹executable›
switch, to name the executable file, instead of using the default
name.
One can always use the strip program to remove symbols
from release executables. This will greatly reduce their size. Or one
can simply add the -s option for release builds.
Build Utilities
For non-trivial programs, you want to use a project build utility. IDEs either use the same tools you can use on the command line, or proprietary build tools — but they all provide a way to automate the build process efficiently. We focus on command line tools here.
GNU Make
Regardless of which of the many build utilities you may use, you should know at least some features of GNU Make — it is almost considered mandatory. The simplicity of C/C++ compilers, which allow you to compile only one file at a time, is useful, as it quickly becomes tedious to recompile all files in a big project every time one file changes.
The strategy is to control the compilation process, so that it leaves the object files, instead of deleting them. Furthermore, if we compile one source file at a time, it means we only have to recompile any changed files. Then we follow with linking all the objects files into an executable. If, in addition, we can formalise the process, this can be automated.
This is where Makefile comes in: it is the default name
make will look for when invoked. It can contain
dependencies and recipes using GNU Make's syntax.
If correctly specified, this means that make will only
compile modified files when invoked, and run the linking recipe, if
necessary.
Other Build Tools
A useful tool is CMake, which creates make files for various Make utilities, including Microsoft's MSBuild. It supports numerous environments, and should definitely be part of your toolset.
Another emerging tool is Ninja (Android, for example, is built with it). It is very fast and uses a simpler syntax than Make, although it is less powerful for complicated builds. Also, CMake can create Ninja project files. Ninja is seldom used directly.
Supplementary Tools
In practice, compilers, linkers and program maintenance utilities are not enough for real-world application development. Luckily, many free top-shelf tools are available, in addition to the commercial tools.
Code Formatting
Consistent formatting of code across a project sounds like a trivial topic, but it builds confidence in the code. It also helps the brain's pattern matching mechanisms — it is easier to recognise language constructs if they look familiar, and you do not have to parse the text for every different variation in formatting.
This is often called “pretty printing”, or “code beautification”, suggesting the aesthetic appeal of consistently formatted code. The key is consistency. The problem is that, even when consistently formatted, free-format languages like C/C++ allow everybody to have a different ideal regarding the actual formatting (whitespace, curly brace position, etc.).
There are many available tools that can be used for formatting. One of these is Artistic Style, which has been around for many years, and supports many languages and styles. It is also very configurable, so you should be able to find a set of options that satisfy your, or your team's, requirements.
Static Code Analysis
Static analysis tools can help to find questionable code or program errors beyond syntax errors, which is outside the scope of C/C++ compilers. One of the oldest is the Unix Lint utility, but the only freeware version for Windows is Splint, which is heavily out of date.
The best freeware alternative to Lint is the portable Cppcheck. This has grown, from a single executable to a set of files that must be installed (although a portable-app from a third party, exists for Windows). It can also be integrated in some IDEs. A list of checks is available. Cppcheck is active and constantly updated, and highly recommended.
Code Documentation
Although it is not many programmers' favourite activity, correct and current code documentation is crucial during the lifetime of a project. This is so important that many programming languages (e.g., Java, Python, C#, Go, Rust) have formalised the concept of standardised comments and documentation generation tools.
For C/C++, we recommend the venerable Doxygen. Doxygen can utilise
tools like dot from the GraphViz suite to automatically
generate call graphs, include graphs, and inheritance diagrams. It can
generate CHM files, if
the HTML Help
Workshop tool is installed (it only requires the
hhc.exe command line program, but there is no way to obtain
it other than to install the whole Workshop program). Doxygen can be
integrated in the build process, and some IDEs
have plugins that support Doxygen.
Running Doxygen simply means setting up a Doxyfile
(default name) configuration file, and running the single command line
program: doxygen, in the same directory. It can even
generate a default Doxyfile for you, with comments for each
and every setting. The hardest part is setting up the numerous options
according to your preferences — after that, you simply copy your
Doxyfile to new projects, and change project-specific
settings in the Doxyfile. For those who prefer it, Doxygen
does have a GUI.
Doxygen only processes special comments. It has a rich keyword set to formally document files, functions, parameters, return values, classes etc. The comment text can use Markdown markup for formatting, bullet lists, links, images, headings, etc. A project-specific external “main page” can be configured to serve as the landing page for your HTML formatted documentation. The CSS and other features can be customised. There is little negative to say about Doxygen.
Library API Lookup
On MacOS, almost every serious developer uses, or at least knows of, Dash. Dash has a freeware component, as well as the option to purchase a licence for extra features. It supplies several official “docsets” which can be downloaded for offline use, and several third party docsets are also available.
For those who are not using MacOS, a recent freeware tool called Zeal is available on Linux
and Windows. It uses the same docset compilations as Dash, which for
C/C++ comes from CppReference.com — as good as, or
arguably better than, cplusplus.com. You can also download
a portable .zip version — no
installation required.
We strongly recommend Zeal. Firstly, it is much faster than online lookup. Secondly, the documentation is regularly updated. Thirdly, it uses formal and correct terminology, consistent with the C/C++ standards, and not colloquialisms and slang as is common on forums. It is worth the effort to learn how to read formal C/C++ documentation, and at the same time learn to be more consistent with your use of C/C++ terminology.
Debugging
Source-level debugging can be performed with GNU Debugger (gdb), as long as the
source files of the executable have been compiled with the
-g switch. Depending on your version of
gdb, and the options you use, you might need to have
Python on your path.
GDB can do everything you expect from a debugger, except you have to enter commands, instead of clicking on buttons. Once you run gdb, it displays a prompt, waiting for your debugging commands, just like a shell. It executes those commands when you press ‹Enter›. You can set and list breakpoints, watch variables, dump memory, single-step into functions, single-step over function calls, exit the current function, and numerous other possibilities.
Generalised Steps for Simple Projects
In the learning process, we do not require many files or libraries. As a result, the process to create a new project for testing or exercises is quite simple. The steps outlined here assume you have your command line shell open, and have set the current working directory to the location where all projects are stored.
The top-level ‘work’ directory, can be any directory where you
practice your development. On our course, it could be:
C:\Course\Work, or C:\Course\rxmingw64\work,
or any directory of your choice. The example command lines here assume
that the directory already exist.
If using the Command Prompt on Windows:
$> Set Work Directory (Cmd Prompt)
In case your are using PowerShell:
$> Set Work Directory (PowerShell)
If using the Cygwin or MSYS2 environments with Bash:
$> Set Work Directory (Cygwin/MSYS)
The prompt part of the command line, unless customised, will show the current directory. It can be any directory, but we generally avoid spaces in the whole path.
In a POSIX shell, like bash
under Unix, MacOS, Linux or MSYS2, you will generally work in your
home directory ($HOME). In this case, assuming you
have a work directory inside your home directory, simply
execute (the first command will fail if the directory already exists, so
it is safe to run):
$> Set Work Directory (POSIX)
$ cd ~/work
The ~ (tilde) is a
shortcut for $HOME in many POSIX shells.
Choose a Project Name
The first step is to decide on a project name. This is also often requested by IDEs. Ideally, the project name should not contain spaces or other illegal file system characters. For your purposes, we'll represent the chosen name with: ‹project› — replace it everywhere below with your project name.
C programmers, in particular, generally avoid capital letters in project, file and directory names. C++ programmers are more likely to use capital letters for file and directory names. Generally, this is because, organisationally, each source file will contain a single major class, whose name will conventionly contain capital letters. Files containing these classes are normally named after the class.
Create a Project Directory
It is common practice to create a directory for the project using the project name. Once the directory is created, we should make it the current working directory. The following commands will accomplish that in any shell:
$> Create ‹Project› Directory
$> cd ‹project›
This is simply organisational convenience. The C/C++ compiler and other tools do not care in what directory you put your source files. Even for simple programs, this is just a good convention, not a requirement imposed by any tool.
Create Source Files
Any editor can be used, but generally we prefer a programmer's editor
like Vim, gVim, or Notepad++ (Windows only). Linux and Mac OS X also
have many free and capable programmer's editors. We usually rename
Notepad++.exe to npp.exe in our packaging of
MinGW-w64 + utilities on Windows, which is what we demonstrate here:
$> Create Source File
You can replace npp with the
appropriate editor name, as long as it is on your PATH. For
example, if you're using Vim/gVim, you can use
vim, or
gvim; use
code for VSCode. Otherwise, just open your
editor, create a new file with the proper extension, and save it in the
‹project› directory.
We suggest you have a look at Visual Studio Code, which is
not well-named, but is a very capable and modern programmer's editor…
though has nothing to do with Visual Studio itself. It runs on
MacOS, Windows and Linux, and on Windows (at least), you can set it up
as a relocatable (portable) program, if you do not want to install it.
If its executable (Code.exe) is on your PATH,
you can invoke it simply with: code.
NOTE — Main File Name
It is acceptable to name the source file that contains
main() as main.cpp/.c, instead of
‹project›.cpp/.c. This is, in fact, a very
common convention, especially when we write bigger programs containing
more than one source file.
‹project›.cpp
— Example Minimal C++ Program
/*!@file  ‹project›.cpp
*  @brief ‹Project› C++ Program
*/
#include <iostream>
#include <string>

int main () {

   using std::cin;  using std::cout;  using std::string;

   cout << "Your name?: ";
   string name;
   if (!getline(cin, name)) {
      std::cerr << "Invalid input. Terminating.\n";
      return EXIT_FAILURE;
      }
   if (name.length() == 0)
      name = "World";
   cout << "Hello, " << name << ". And bye..." << std::endl;

   return EXIT_SUCCESS;
   }
‹project›.c
— Example Mininal C Program
/*!@file  ‹project›.c
*  @brief Minimal C Program
*/
#include <stdbool.h>
#include <stdlib.h>
#include <string.h>
#include <stdio.h>

int main (void) {

   printf("Your name?: ");
   char name[128] = { 0 };
   if (!fgets(name, sizeof name - 1, stdin)) {
      fprintf(stderr, "Invalid input. Terminating.\n");
      return EXIT_FAILURE;
      }
   int l = strlen(name);
   if (l <= 1)
      strcpy(name, "World");
   else if ((unsigned)l < sizeof name - 1)
      name[l - 1] = 0;
   printf("Hello, %s. And bye...\n", name);

   return EXIT_SUCCESS;
   }
After saving the source file, it can be compiled. It is not necessary to close the editor. You can have the editor open in one shell, if you're using Vim, and compile in another instance of the shell.
Note — Optional Return Statement in Main
In either C99 or C++11 and later, a
return statement in main() is
not required — but this is not a generalisation; it only applies to the
main() function, and will cause the compiler to
automatically add: return 0; at the
end.
Some developers use the convention where the source file containing
the main() function, is called
main.c or
main.cpp. This is not a bad convention, so
you are welcome to follow this convention. Just replace project.c or project.cpp with
main.c.cpp.
Compile the Code
The following command will drive several compilation phases. It will delete all temporary files and object files, regardless of whether an executable was successfully created or not.
$> C++ Debug Compile
$> C99 Debug Compile
The g++/gcc programs drive the whole
process as described above, just like an IDE
drives the exact same process, when you click on the ‟Build” or
equivalent button for your IDE. Also, the above
command line adds support for the GNU debugger
(gdb), with the -g switch, which means this
command line is for a debug build. For a release
build, you can use:
$> C++ Release Compile
$> C99 Release Compile
The -s option is optional. It will prevent the addition
of symbols to the executable (useful only for debugging). One can
alternatively use the strip
command to reduce the size of a release build executable by
removing those symbols:
$> Strip Symbols (Optional)
# On Windows, even Cygwin:$> strip -s ‹project›.exe
# On Linux:$> strip -s ‹project›
# On MacOS:$> strip -xX ‹project›
In order to debug a debug build executable with the GNU Debugger, you can run the following command. Just
omit the .exe where not applicable.
$> Debug with GDB
The actual debugging process is described in another document.
Execute the Programs
If you are used to a GUI operating system environment, you might be inclined to double-click on everything to get some action from the operating system. Double-clicking the resulting executable from the above process might execute the program. But since it is a command-line program, a console or terminal will be created for it to run in, which will be closed when the program terminates. Output will disappear, unless the program pauses for input.
The best way to execute a command-line program, is to run it from an
existing shell. The Windows Command Prompt automatically looks in the
current directory, so to execute the above program, you simply have to
type (appending .exe is optional):
$> Execute Program (Cmd Prompt)
In POSIX shells, and PowerShell, all of which do not automatically look in the current directory, execute the program as follows (where the period character means “current directory”).
$> Execute Program (POSIX & PowerShell)
# POSIX:$ ./project
# PowerShell:> .\project
For any operating system, if the directory containing the executable
is listed in the PATH environment variable, simply stating
the name will be sufficient. Alternatively, the full path name must
precede the executable name.
Separate Compilation Phases
Although it may not be useful for a single file program, it is recommended that you break down the individual compilation phases for projects with multiple source files, for better compilation efficiency (only compile what has changed).
The preprocessing phase is handled in GCC
with the cpp (C pre-processor) program. It is easier to
call it indirectly in the normal way with the g++
orgcc drivers, but the -save-temps
command-line option will instruct them to not delete, amongst other
files, the temporary file produced by the preprocessor. Not all switches
are repeated here:
$> C++ Save All Temporaries
$> C99 Save All Temporaries
You can add -masm=intel and/or
-fverbose-asm to control the assembly output. The temporary
files will be:
- ‹project›
.iicontains the output produced by the preprocessor for C++, and - ‹project›
.icontains the output produced by the preprocessor for C, and - ‹project›
.scontains assembler code emitted by the code generation, and - ‹project›
.ois the object file produced from the assembler.
Preprocess and compile one or more
*.c/*.cpp files, save the objects, and do not
call the linker:
$> C++ Prevent Linking
$> C99 Prevent Linking
For any number of source files, only produce the resulting assembler
files as *.s files. Adding the assembler switches:
-fverbose-asm and -masm=intel, are
optional.
$> C++ Produce Only Assembler Files
$> C99 Produce Only Assembler Files
Only call the preprocessor on one file. If the -o switch
and its argument are not given, the preprocessed output will be written
to standard output. Calling the preprocessor (cpp)
directly, depends on whether it can find the include files. This way, it
is guaranteed to work.
$> C++ Produce Only Preprocessed Files
$> C99 Produce Only Preprocessed Files
Only call the linker, as long as only *.o files are
passed as arguments.
Note that we often combine -E with
-P, which will output the results to
standard output. This can be used as a convenience when debugging the
results of specific macros, for example.
$> C99/C++ Perform Linking Only
For most of the above examples, you can add the
-pedantic (or -Wpedantic) switch for more
diagnostics output.
Makefiles
The following Makefile is set up for the C++ example program we presented above,
but you should be able to adapt it for the C99 minimal program. It
is generalised enough, however, that you can use it as a template for
new projects, where you have this Makefile in the same
directory as any number of *.cpp (or *.c)
files that make up the program. Just set the PROG value
appropriately (remember to add .exe after the executable
name, if you use this on Windows).
Makefile
— Minimal Program Makefile
# Simple & Portable GNU Make Makefile for Minimal Program Example
#
# Call make with: `make all`           for a “debug compile”, or
# call make with: `make all RELEASE=1` for a “release compile”.
#
# NOTE: Note that MinGW-w64's make is called `mingw32-make`.
#
# NOTE: The name of the executable is taken from the project directory.
#
# NOTE: For C programs, change occurrences of `$(CXX)` to `$(CC)`, and
#      `$(CXXFLAGS)` to `$(CFLAGS)`. Every `.cpp` should become `.c`.
#
PROG := $(notdir $(CURDIR:%/=%))
SRC1 := $(wildcard *.c)
OBJS := $(SRC1:%.c=%.o)
SRC2 := $(wildcard *.cpp)
OBJS += $(SRC2:%.cpp=%.o)
SRCS := $(SRC1) $(SRC2)

# compiler, linker and preprocessor options
#
CC = gcc
CXX = g++
CFLAGS += -Wall -Wextra -pedantic -std=c99
CXXFLAGS += -Wall -Wextra -pedantic -std=c++11
CPPFLAGS +=
LDFLAGS += -lm -s

# set release or debug build flags
#
ifdef RELEASE
   CFLAGS += -O2 -DNDEBUG
   CXXFLAGS += -O2 -DNDEBUG
   LDFLAGS += -s
else
   CFLAGS += -O0 -g2
   CXXFLAGS += -O0 -g2
endif

ifeq ($(OS),Windows_NT)
   PROG  := $(PROG).exe
   SHELL := powershell.exe
   .SHELLFLAGS := -NoProfile -NoLogo -Command
   FILES := $(PROG),*.o
   RMCMD := Remove-Item $(FILES) -ea SilentlyContinue; $$true > $$null
   CPCMD := Copy-Item $(PROG) $(PREFIX)/bin/
   ECHO  := Write-Output
else
   RMCMD := rm $(PROG) $(OBJS) > /dev/null 2>&1 || true
   CPCMD := cp $(PROG) $(PREFIX)/bin/
   ECHO  := echo
endif

# Generic rules to create object files from a `.cpp` or `.c` file.
#
%.o: %.cpp
	@$(ECHO) "COMPILE $^ -> $@"
	$(CXX) $(CPPFLAGS) $(CXXFLAGS) -c -o $@ $<
%.o: %.c
	@$(ECHO) "COMPILE $^ -> $@"
	$(CC) $(CPPFLAGS) $(CFLAGS) -c -o $@ $<

# Use the compiler driver to link objects into an executable. For
# C programs, change `$(CXX)` to `$(CC)`.
#
$(PROG): $(OBJS)
	@$(ECHO) "LINK $^ -> '$@'"
	$(CXX) -o $@ $(OBJS) $(LDFLAGS)

# Generic (not real file) targets.
#
.PHONY: all clean

# Also clean preprocessed and assembler files, just in case. checks
# if running on Windows (only OS that has `ALLUSERSPROFILE` as standard).
#
clean:
	$(RMCMD)

all : $(PROG)
If you do not use Cygwin or MSYS2, you may
not have make available, but you should have at least
mingw32-make. You can use that, instead of
make, on the command line. Before every recipe line, GNU Make expects a hard tab character; not a
sequence of spaces. If you copy and paste the above
Makefile, it must contain hard tab characters, and these
should not be replaced by spaces in your editor.
The ⋯2>/dev/null || true part in the recipe will only
work when running in a POSIX shell, and also
Cygwin or MSYS2 on Windows. If you are using the
Command Prompt instead, you will have to remove that. In that case you
might also not have rm available, so then you should
replace the whole recipe with: cmd /c del… command:
clean recipe for Command Prompt users
clean:
	-@cmd /c del $(PROG) $(OBJS) *.ii *.s *.bc 2>NUL:
This should not be necessary in the above Makefile
example, since we (simplistically) test if we are running on Windows, by
checking the contents of the OS environment variable.
operating system detection in a makefile example
ifeq ($(OS),Windows_NT)
	THEOS := Windows
else
	THEOS := $(shell uname -s)
endif
From this point on, the rest of the Makefile code could
test THEOS:
conditional directives based on operating system
ifeq ($(THEOS),Windows)
	-@cmd /c del $(OBJS) $(PROG) 2>NUL:
else
	-@rm  $(OBJS) $(PROG) 2>/dev/null || true
endif
On MacOS, uname -s will return Darwin, and
on Linux: Linux, so you could use those values when you
want to differentiate between the latter two operating systems.
In both examples, you can remove the *.ii,
*.s and *.bc parts, if you have not been
experimenting with persisting temporary preprocessed and assembler
files.
Key Terminology
It is important to become familiar with the key terminology relating to C/C++ and the compilation process. For example, we must not confuse the terms declaration and definition when discussing variables and functions, as these have different effects regarding entries in the object file.
- compilation unit
-
The formal term for the temporary file produced by the preprocessor. This is a single file, or compilation unit. The
.cor.cppfile in your editor is not a compilation unit. It will, however, become part of the compilation unit, once the preprocessor's run has completed. - declaration
-
A syntax that only makes an identifier known to the compiler, with sufficient detail to allow code to be generated, with the missing parts to be supplied by the linker. Declarations with external linkage create external references in object files. They occupy no further space in an object file. All external references, in all object files, must be linked with a corresponding public symbol for the linking process to succeed.
- definition
-
A syntax, different from declaration syntax, that creates an identifier (variable or function). In the process, it also makes the identifier known to the compiler. The names of identifiers with external linkage are written to the public symbol table of object files. The space for the identifier is allocated in the object file, and constitutes either data space (variables), or machine code space (functions).
- lifetime
-
In C/C++, a variable can have local or global lifetime. Only variables with global lifetime are stored in object files, and consequently will form part of the executable file. Variables with global lifetime are initialised at compile time.
- linkage
-
An identifier can have external linkage as part of its storage class specification, e.g.
extern(implicitly or explicitly), which means its name is entered as a public symbol in the object file. When it does not have external linkage, it is often denoted as having internal linkage. - separate compilation
-
This term refers to the behaviour of C/C++ compilers, where they can only compile one file (compilation unit) at a time. A consequence this, is the need to repeat declarations and types, which is where header files come in. The advantage is that, as long as object files are available for files in a given project, we only have to recompile changed source files, and then link the object files again to obtain a new executable.
- static binding
-
Calls to functions (which involves calling and address), and the addresses of variables are determined at compile time — either by the compiler, or the linker. This is what static binding refers to. Apart from the simplistic C++ RTTI support, C/C++ offers no dynamic binding syntactical features.
- statically typed
-
C/C++ are statically typed languages, which means all types must be known at compile time. The concept of types is a compile-time abstraction, that determines storage size in memory or in object files; and the machine code instructions emitted to work with values. This absolves the programmer from having to deal with it (a tedious and error-prone process in assembly language).
- storage class
-
A collective term for the following three individual features: linkage (external / internal), lifetime (local / global) and scope (file / block). Storage class does not include dynamic memory, or what some programmers refer to as “dynamic lifetime”: dynamic memory is not a syntax feature of the language.
2024-11-25: Update WinLib's download links to latest version.
[brx]
2024-09-28: Prefer WinLib's MinGW-w64, new Makefile & minimal C
program. [brx]
2023-10-23: Add note about strip and the -s
option. [brx]
2021-11-22: Update Nuwen's MinGW version number. [brx]
2021-03-01: Fix output of where make. [brx]
2020-06-21: Add Nuwen-MinGW installation steps. Other minor edits.
[brx]
2020-02-26: Add MinGW-w64 distributions links &
CPPFLAGS in Makefile. [brx]
2019-02-25: Updated conventions for projects. Fixed command lines.
[brx].
2018-11-12: Added note about return statements in main(). [brx].
2018-07-23: Add compilation process images. Make more C99-friendly.
[brx].
2018-05-14: Add -c switch to linker option list[brx].
2017-11-18: Update to new admonitions. [brx]
2017-09-21: Created. Edited. [brx;jjc]